


|
|
|
|||||||||||||||||||||
|
|
|
|
|
|
|
|
|
|
|
|||||||||||||
|
|
|
|
|
|
||||||||||||||||||
|
|
|
|
|
|
|
|
|
|
||||||||||||||
|
|
|
|
|
|
||||||||||||||||||
|
|
|
|
|
|
|
|
|
|
||||||||||||||
|
|
|
|
|
|
||||||||||||||||||
|
|
|
|
|
|
|
|
|
|||||||||||||||
|
|
|
|
||||||||||||||||||||
|
|
|
|
||||||||||||||||||||
|
|
|
|
|
|
|
|
|
|
|
|
|
|
|
|
|
|
|
|
|
|
|
|
| Artificial Incubators in the Finch Bird Room | ||||||
 |
||||||
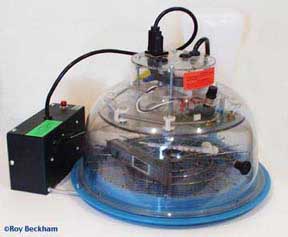
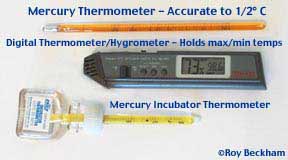
| • The Turn-X Incubator | ||||||
|
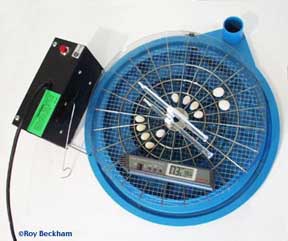
The Turn-X incubator manufactured by Lyon Electric is probably the best incubator for the purpose of incubating finch eggs. It is a small tabletop model with an hourly egg turning mechanism that works well with small finch eggs. There are a number of different turning rings for automatic turning of eggs as large as a goose egg to as small as a waxbill's egg. For turning finch eggs, get the universal turning ring (940-28). It can handle eggs that range from 1/4" to 1-1/4". I recommend the model TX-7 over the TX-6 for a number of reasons. Namely, the highly accurate 10 turn solid state thermostat. Each full turn of the control adjusts the temperature approximately 1.7 degrees F. The TX-6, built on the same "body" as the TX-7 has a less accurate thermostat. This is fine for larger chicken eggs, but not for the smaller finch eggs that are more sensitive to the fluctuations in temperature. They don't have the mass to hold the temperature for a long period that larger eggs do. The TX-7 also comes with mercury thermometers rather than the spirit thermometers of the TX-6. These are accurate to the 1/2 degree and are more reliable. The carded spirit thermometers are probably accurate to within + or - 2 degrees if you're lucky. Too great of a variation for proper incubation. Those two things, the thermostat and thermometers, are the only differences between the TX-7 and the TX-6, but they are big differences. Don't despair if you have a TX-6 though. You can buy the upgraded thermostat (220--12) and install it into the TX-6. You can either install the mercury thermometers that come with the TX-7 or put other more accurate thermometers in. There are a number of choices, but be prepared to pay for them. Good thermometers do not come cheap. But when you think of the potential price of the birds you may gain from proper incubation, it's worth the high price. Lose one clutch of Gouldian eggs and you'll wish you had bought the better thermometers. Go cheap somewhere else, not on temperature control or measurement. (Some thermometer styles I use) The automatic turning mechanism used on the Turn-X is my preferred method of turning eggs. (There is one other method that I like that employs rollers, but those are not practical here.) I prefer the mechanical rolling of the eggs back and forth every hour as opposed to turners that slowly rock the eggs from side to side. For some eggs that have slow vein growth, this more rapid turning at greater intervals seems to stimulate growth. It simulates the turning a hen would perform with the eggs on their side rather than one end pointing up. I rarely have troubles with the turner damaging eggs. You can also turn the eggs by hand, either turning the outer body of the Turn-X or by lifting the top and manually turning the eggs, but quite frankly, I don't consider this an option since the turning every hour is so beneficial to the developing chick. Unlike incubating eggs of gallanaceous birds (chicken-like birds that are born independent and ready to run), it is never my intention to raise the chicks on my own. I have no desire to hand feed tiny little finch chicks. The reasons I incubate finch eggs is to test the fertility of a pair, save abandoned eggs, or to start incubating a number of eggs and then only foster the fertile ones. Testing fertility - If a particular pair seems to be laying infertile eggs, but you're not sure if they are sitting them properly, you can test the fertility with the incubator. Incubate the eggs for 3-4 days and then candle them. If they are fertile, you will see development in the egg. If not, time to look at problems with the birds. Save abandoned eggs - Occasionally, you will notice that a sitting pair has suddenly gone off the nest and are not incubating any more. Quick action here can save the clutch. I have lost Gouldian hens while they were sitting on a clutch that was near hatching. Since my males will not incubate during the night, the clutch would have been lost. By placing the eggs in the incubator I was able to keep them alive until suitable foster parents could be set up. Once, I noticed a gouldian hen on the floor of the cage suffering from constipation. I removed her eggs and placed dummy canary eggs in the nest. After recuperating, two days later she continued sitting again. I returned her eggs and she raised the clutch successfully. There are some guidelines here. Eggs in the beginning stages of development, say the first week, do not survive for very long when left in the cold. Older eggs, in the second week of development, seem to take these periods of cold with little ill effects. I have had eggs left in 40 degree weather for a day and a night hatch out successfully after revival in the incubator. Just because they are cold, don't give up on them. What have you got to lose? By placing them in the incubator and candling them after a few hours of warming up, you will often see the heart beating or the embryo swirling in the egg - a good sign that you made it in time. Preparing eggs for foster parents - Why bother to pre-incubate the eggs if you're only going to put them under foster parents anyway? You can set up fewer foster pairs by only setting fertile eggs under them, you can decrease the turn-around time between clutches, and if you have eggs that are fresh but don't have fosters that are ready, you can save them by beginning the incubation process. By setting the eggs in the incubator after you have collected them, you can determine which are fertile and only place those under foster parents. This will allow you to run fewer pairs of fosters. Example, if you place on average 6 eggs under foster parents and have 40 eggs, you will need about 7 foster pairs ready. If your fertility rate is about 80%, then you will only have 32 viable eggs. For this you would only need about 5 pairs of foster as opposed to the 7 needed before with some of them raising small clutches and sitting on infertile eggs. If you have eggs in the incubator beginning the incubation process, you can set eggs under fosters that have already been in the incubator for a week when they just start to sit in earnest. This dramatically decreases that sit to hatch time and the fosters usually don't mind. Lastly, there's no need to throw away good eggs just because you don't have a foster pair ready just yet. Here you can begin incubating eggs while you set up an eager pair or while a pair is weaning off their last clutch. If you know that you'll have a foster pair ready before the eggs hatch, put them in the incubator. Even in the best of storage conditions, the longer eggs sit unincubated, the survival rate of the fertile eggs drops dramatically. If you have incubated chicken eggs or button quail eggs, you have the knowledge for incubating finch eggs. They are the same, just a heck of a lot smaller. The smaller size does make them a bit more susceptible to fluctuations in temperature and the thinner shell also makes humidity and ventilation control more important. I set the temperature for incubating most finch eggs at 99.5 degrees F. The humidity is fairly constant at 75 percent or 91.5 on the wet bulb. In the Turn-X incubator, I set the water to fill the first 6 chambers in the bottom pan. (Humidity often needs to be adjusted to your particular location depending on the relative humidity and altitude) I do not alter these settings like I might for quail eggs as the egg nears hatching since I'm often adding and removing eggs at various stages of incubation. So while I'm just adding some fresh eggs, I might be pulling some 10 day old eggs to be placed under fosters. Since I don't know when I might need the incubator, such as when a hen suddenly stops sitting, I leave it running just about all the time. This way it is already warmed up and ready to go at any time. When using the universal turning ring in the Turn-X, you'll find that the inner rings are used much more often than some of the outer rings. I do not use the openings on the extreme outer rings at all. Those are suitable for button quail sized eggs. The first three rings are the best for finch eggs. I use the first two rings for Owl, Zebra and small mannikin sized eggs. The third ring can be used for the larger or more rounded finch eggs such as Gouldian, Star finch, or Red-Headed finches. The turning arm if set in the 5th hole from the end will give good results in all the rings. You can candle the eggs after only 24 hours of incubation and begin to see the first signs of a fertile egg. I usually give the egg a full 4 days of incubations before I decide to pull the infertile ones. Candling eggs can tell you so much more than if an egg is fertile or not. Often, older eggs will begin to develop and show growing veins and a beating heart, but candling the egg after about a week may show you that the vein development is not proceeding correctly and that the chick will eventually die before hatching. Sometimes eggs will develop veins on one side, but not the other. These eggs are doomed as well. Humidity in the incubator can also be monitored by watching the air cell in the end of the egg. If the humidity is too low, the air cell will grow too large, too quickly. The reverse is also true. An egg should lose about 15% of their initial weight during incubation. If you place cold, abandoned eggs in the incubator and then candle them hours later, you'll often be able to tell if you got to the eggs in time. Depending on the stage of development, you'll see the heart beating or a swirling embryo in the shell. Point is, learn to candle your eggs. There's so much more to be learned than simply if the eggs are fertile or not.
• Watch out for the plastic "lugs" that hold the wire bottom in place on the Turn-X. Eggs that are in the second ring can be rolled over these lugs during the automatic turning and damaged. Watch to see which openings go over the lugs in turning and avoid them. • You can replace the 1/4" screen in the bottom with a finer 1/8" screen or better yet, the nylon screen used in ebroidery if you find that the screen is damaging your smallest eggs or if you intend to let the chicks hatch in the incubator. Some of the smaller chicks will fall through the 1/4" wire, and Gouldian chicks will fall though to their butts and dangle just above the water (if you're lucky). • Make sure that the turning ring hits the egg on the lower half of the egg to keep the ring from rolling over the eggs and crushing them. • If you run the incubator for a long time, the wick will often become encrusted with minerals from the water giving you a false reading. • Use only distilled water to cut down on the lime deposits in your machine. • Clean your incubator regularly to remove those lime deposits, the scummy film that forms on the water and to avoid the build up of bacteria. If you notice that you seem to have fertile eggs that die somewhere between the first week to hatching, give the incubator a good disinfecting cleaning. • Draw a layout of the turning grid so that you can write down a log of what eggs are from what species and what date it was put in. • Eggs can be lightly marked with a soft pencil or use a Sharpie(R) marker to make small symbols. The ink should be nontoxic. • Don't forget to plug in the turner after servicing your eggs! (sounds stupid, but after you've had the Turn-X for a while you'll understand) • Don't incubate the eggs unless you have a place to put them or are only checking fertility. You could end up with a bunch of hatched chicks in your incubator with no place to put them. • Keep track of hatch dates or you'll have chicks hatching in the incubator. It's better to have the eggs hatch under the fosters. • More information on fostering finches to come. |
| Lyon Electric (810) 657-9450 | Manufacturers of the Turn-X incubator |
| Cutler's Pheasant Supply (810) 633-9450 | Reseller of the Turn-X and other equipment |
| Stromberg's Chicks & Gamebirds Unlimited (800) 720-1134 | More incubators and supplies |
| Cole-Parmer Instrument Company (800) 323-4340 | Thermometers and hygrometers |
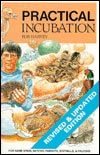
| Practical Incubation, Rob Harvey, ISBN 0-88839-310-5, 1993 Hancock House Publishers |
| The Incubation Book, Dr. A.F.Anderson, ISBN 0-904558-70-3, 1982 World Pheasant Assoc. |
| Societies as Fosters, Robert Black, ISBN 0-910631-02-6, 1987 |
